Entries in How To,Revolver

ASG CZ 75 P-07 DUTY and Dan Wesson 6 & 8 inch Revolvers coming soon!

12 Comments

Related Posts:

I am really excited to let you in on some more Replica Airguns Store news. We have some really nice Air guns from ASG on order, I don't just yet have an ETA on when they will be here but should know in a little while...

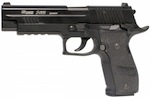
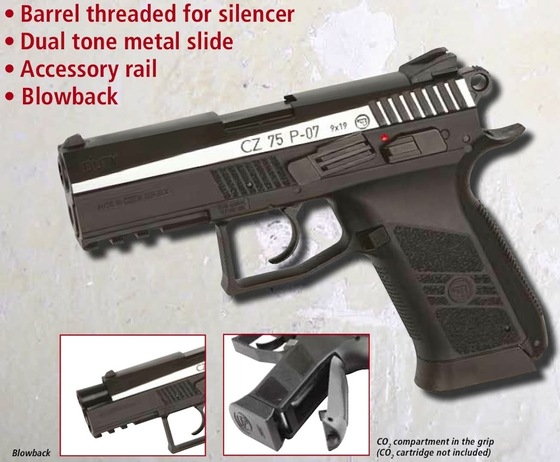
First off we have the ASG CZ 75 P-07 Duty in Blowback Dual Tone:

"The CZ 75 P-07 DUTY is the new generation of the CZ 75 family which was first designed back in 1975 by the famous small arms manufacturer Česká zbrojovka, Czech Republic. This is the semi automatic 4.5mm (.177) airgun version fully licensed by CZ. It is powered by a 12g CO2 cartridge stored in the grip using the easy-load system and the BB’s are put in the drop-out magazine. The CZ 75 P-07 DUTY is a compact tactical upgraded version compared to the standard CZ 75. Besides being more compact in size the P-07 DUTY has an integrated front waiver rail for mounting light and laser. The grip and metal slide carries authentic CZ markings and every gun comes with unique serial number."

  • Length: 7.3 inches.
  • Weight: 1.8 pounds.
  • Magazine: 4.5mm BB's x 20.
  • FPS: 361.

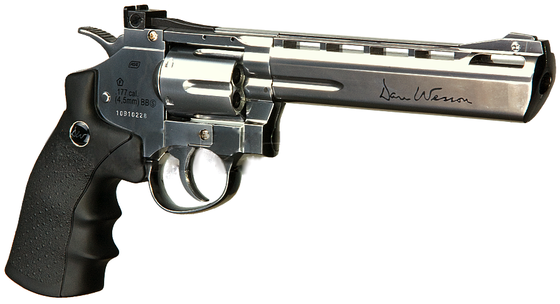
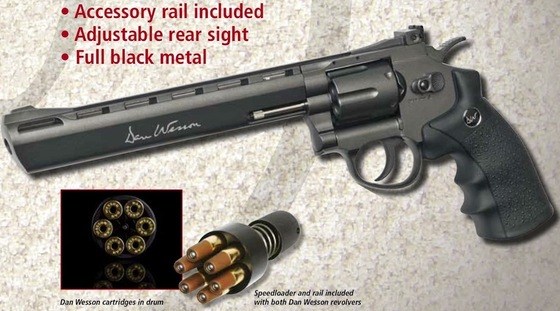
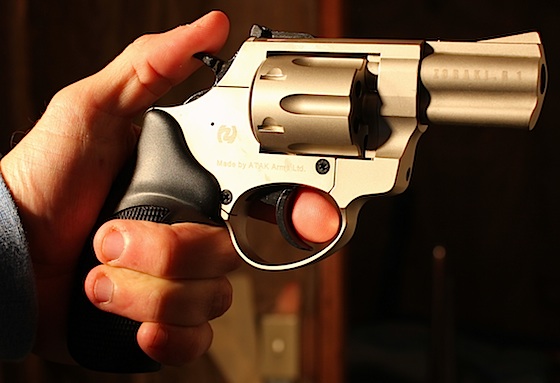
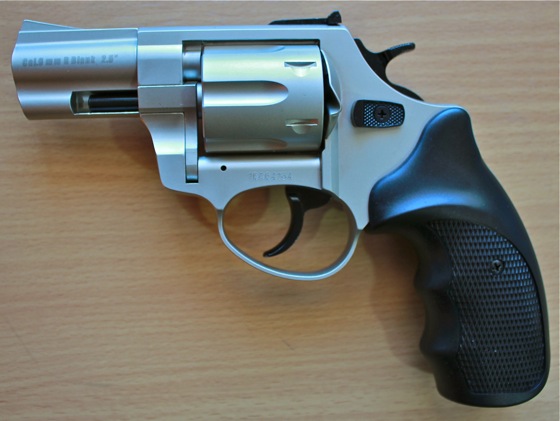
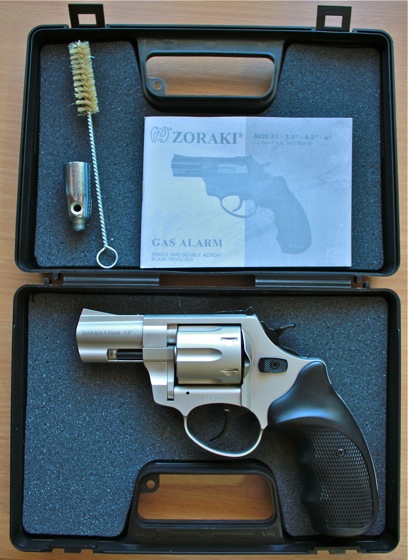
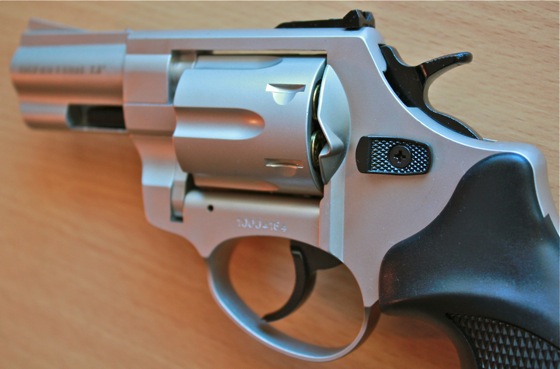
We also have on order some ASG Dan Wesson Revolvers in 6 inch Nickel and 8 inch Black barrel Versions:

"The legendary semi automatic revolver licensed by Dan Wesson – 6” silver and 8 inch black versions. The revolver has authentic markings and an individual serial number stamped into the frame. The revolver features a double action trigger system and adjustable rear sight for extra realism and accuracy. The Dan Wesson revolver is made of metal except for the ergonomical grip constructed in hard ABS plastic.

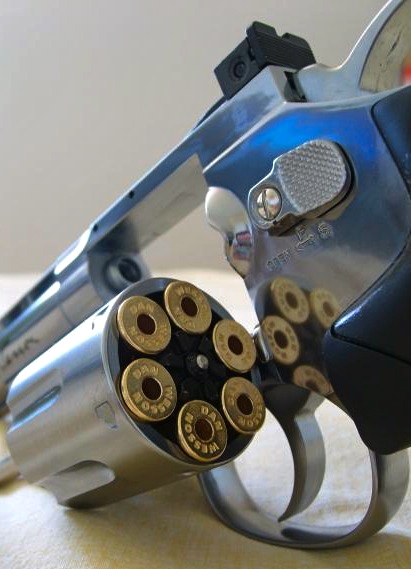
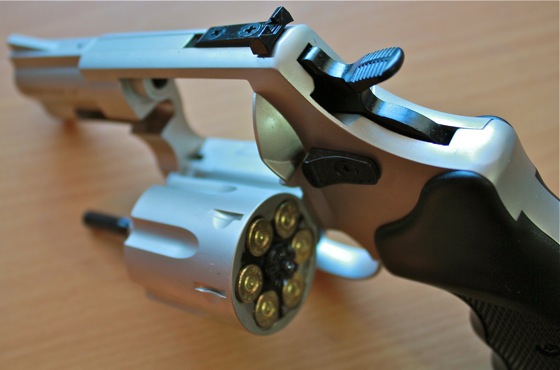
The 12g CO2 cartridge is stored under the grip and is easily accessed by sliding the grip to the side – easy-load style. Each of the 6 cartridges holds one BB and is placed in the metal drum that rotates as each round is fired. The revolver comes with a speed loader, changeable tactical rail and 6 cartridges."

  • Length: 11.7/13.3 inches.
  • Weight: 2.25/2.3 pounds.
  • Magazine: 4.5mm BB's x 6.
  • FPS: 426.

Categories: 4.5mm / .177 cal, BB, Blowback, CO2, Pistol, Replica Airguns News, Revolver, Semi Auto Tags: ASG, CZ 75 P-07 Duty, Dan Wesson

Cybergun - KWC Mini UZI BB Gun Full Auto Modification

39 Comments

Related Posts:

"Before you attempt to do this modification you need to be aware that it may void your warrantee and/or you may fail and either break something or incorrectly reassemble your Mini UZI rendering it "Broked"! This is your problem so please do not attempt this modification (even though it is fairly easy to do) unless you're 100% confident you can do it and are aware of the possible consequences. Make sure to also take into account any gun laws in your area prohibiting full-auto capable firearms!"

(Special thanks to Herman for showing me the ropes on this modification)

This modification will make your semi-auto "only" Cybergun/KWC Mini UZI BB Gun into a full auto capable 4.5mm BB machine gun. From the factory the full auto switch position (Far Left "A") is disabled but the full auto selector position is visible. The actual full-auto functionality is still present in the Mini UZI but has been decommissioned by the simple means of blocking the selector switch from being moved to the far left full-auto or "A" position.

This full auto modification will show you how to disassemble the Cybergun - KWC Mini UZI BB Gun and remove the small plastic selector switch blockage so you will be able to manually switch between semi auto and full auto modes. This modification takes about 15 minutes to complete.

<!-- google_ad_client = "ca-pub-9036472715040282"; /* Replica Airguns Content */ google_ad_slot = "1487049688"; google_ad_width = 468; google_ad_height = 15; //-->

You will need the following tools: A pair of pliers and either a pair of small wire cutters or a file.

Let's begin! Below are the two pre-modification positions available from the factory:

"S - SAFE"

"R - SEMI AUTO"

Below is a closeup of the top bolt cover that we will be removing to access the internal bolt for removal:

In the next photo we have removed the bolt cover by pressing the "angled button" towards the rear sight:

And now the bolt is removed:

I removed the grips but this is not necessary:

Now you will need to remove the lower receiver pin located at the back end of the receiver closest to the grip safety. Use a pair of pliers to pinch the metal pin while pushing it through. Once the pin is started you can use the pliers on the other side to pull the pin all the way out. You may need to us a fair amount of force to do this as the fit of the pin is tight:

Once the pin is removed the lower receiver can be detached:

You can see in the picture below the small plastic nub that we will need to remove in order to restore full-auto capability:

I used a pair of small wire cutters to clip this plastic nub off, but you could use a file too. Just make sure that the plastic is flush and does not have any burs or protrusions.

Below is a photo of the Plastic Nub removed from another angle:

After that, all you need to do is reassemble you Mini UZI in revers order to finnish the Full Auto modification.

In the below Photos you can see we have restored the ability to move the fire selector switch over to the "Far Left" or "A" position, reenabling the Cybergun - KWC Mini UZI BB Gun to shoot in full auto when desired.

"A - FULL AUTO"

Now enjoy your Cybergun - KWC Mini UZI BB Gun in full-auto as it was originally designed!

Here is my Vimeo Video in Narrative with Photos:

Categories: 4.5mm / .177 cal, BB, Blowback, CO2, Full Auto, How To, Modification, Pistol, Semi Auto, YouTube Video Tags: Cybergun, UZI

SIG SAUER X-FIVE P226 TAKE DOWN FOR STRIPPING AND PAINTING

17 Comments

This Article was graciously provided by one of my viewers: Lee

Related Posts:

DISCLAIMER, PLEASE READ AND UNDERSTAND!

  • This walkthrough is for information purposes ONLY, if you decide to dismantle your BB gun you will void any warranty you have with the manufacturer.
  •  I will not be held accountable for your actions or any damage that is caused by your negligence. Therefore, if YOU decide to dismantle your BB gun and break something during the dismantling or assembling it is your problem not mine.
  • If you don’t feel confident or comfortable doing any of these steps STOP and do not proceed any further or you may do damage.
  • YOU WILL LOOSE ALL THE SIG SAUER MARKINGS ON THE GUN.

Having said all that, this is my first ever instructional so I’m going to try and make this walkthrough as easy as I can for you to understand. You will need the following: Flat tip Screwdriver for the grips, Small Philips Head screwdriver, small punch & needle nose pliers – the last 2 are optional.

Make sure you have a clean work space and lay out every part in the order that you remove it Left to Right, come reassembly time you work Right to Left it makes reassembly so much easier.

Step 1:

Field Strip the slide until it looks like this:

Unscrew these 2 screws, these hold in the “Breech Block” once your unscrewed cup the end of the slide in your hand and let the Breech & Screws fall in your hand – Set these aside.

That’s it your Slide should look like this:

It is now ready for paint removal.

Step 2:

Take the Frame and start removing the grips Left hand side first:

Flip the frame over and remove the right hand side grips:

Carefully remove the trigger return spring, it is under tension and it WILL fly across the room – I spent an hour looking for it one day! Also while we are at it, you can remove the cover to the magazine release.

To remove the safety, place your flat tip screwdriver between the frame and the safety and twist ever so gently this will separate the safety and all you need to do now is grab the safety from either side and gently pull & wiggle until it separates.

Once the safety is removed you will see the safety bar, this lifts off.

Step 3:

Lift this little pin out and remove the spring, very carefully push this pin from the other side and remove, be careful because once this happens your hammer assembly is loose and free from the frame.

Slowly and gently remove the hammer assembly:

Note the little shiny piece that sits on the side of the hammer assembly, try very hard not to let this piece fly out, it is a pain to get back in, if it does fly out keep calm and take your time, don’t force the little spring in, it seats in behind the shiny metal thing – sorry I don’t have a proper name for it.

Also make sure that the spring next to it is in the locked open position, if it snaps back just get the tip of a small screwdriver and slide it to the left until it locks.

The hammer return spring assembly at the back of the grips can be removed and set aside.

Removing the trigger assembly is easier than it looks; you need to remove the takedown lever by rotating it counter clockwise until it stops.

Push it through the frame and rotate it back clockwise to remove it all together.

Remove the screw holding the trigger assembly:

Lift out the trigger assembly; be careful of the slide lock spring it wont Fly out, but it will fall out.

If you want to remove the magazine release, there is a spring that sits at the rear of the trigger guard;

Push the magazine release in part way & with the flat tip screwdriver lifts the up to remove it, once removed the magazine release will simply fall out.

THAT’S IT! We’re done, ready for the paint removal. Any paint stripper is fine.

KEEP IT WELL AWAY FROM THE PLASTIC PARTS!

Follow the manufacturer’s guidelines for use of their product and thoroughly clean the slide and frame after you have removed the paint.

YOU WILL LOOSE ALL THE SIG Sauer MARKINGS ON THE GUN.

Rub over the slide and frame with #0000 Steel wool or 1200 grit Wet & Dry paper. Clean again and using the paper or steel wool with some ALUMINUM polishing compound like Autosol and some good ol fashioned elbow grease polish the slide and frame until you reach your desired outcome. Clean it all down again and wipe it down with a rag that has had gun oil or my preference “Fluid Film”.

Reassemble the gun in the reverse order and viola one shiny SIG Sauer X-Five.

Categories: How To, Modification Tags: Cybergun, Sig Sauer X-Five P226

Zoraki 914 & R1 9mm and Kimar Lady K 8mm Blank Gun Test Fire

No Comments

Related Posts:

Below is my Vimeo Video of the Zoraki Mod.914Zoraki Mod.R1 (2.5) and Kimar Lady K Blank

Guns. I fire 9mm and 8mm P.A.K blank ammunition through these guns and even show off the Zoraki Mod.914 in full auto firing mode. In the Vimeo Videos I also slow down the video to one-quarter speed so you can really see the action of these blank guns.

Zoraki Mod.914

  • 9mm P.A.K. Ammunition

  • 14 Round Magazine

  • Semi & Full Auto Modes

  • Front Muzzle Firing

Zoraki Mod. R1

  • 9mm P.A.K. Ammunition

  • 6 Round Capacity

  • Single & Double Action

  • Front Muzzle Firing

Kimar Lady K

  • 8mm P.A.K. Ammunition

  • 6 Round Magazine

  • Semi Auto Only

  • Top Muzzle Firing

Here is the Vimeo Video of my Zoraki 914, R1 and Kimar Lady K Blank Gun Test Firing:

Blank gun.jpg
Categories: 8mm, 9mm, Blank Gun, Full Auto, Pistol, Review, Revolver, Semi Auto, YouTube Video Tags: 914, Kimar, Lady K, R1, Zoraki

ZORAKI R1 (2.5) 9mm P.A.K. BLANK REVOLVER REVIEW

12 Comments

Related Posts:

Type: Blank Gun.

Manufacturer: Zoraki - Atak Arms.

Model:Zoraki R1 2.5.

Materials: All metal with plastic grips.

Weight: 1.7 pounds.

Barrel: 2.5 inches, semi plugged - front firing.

Propulsion: Gun powder.

Action: Single and double action.

Ammunition Type: 9mm P.A.K. or 380 R Blanks.

Ammunition Capacity: 6 rounds.

FPS: N/A.

Trigger Pull: The trigger pull is good overall, even in double action mode it is smooth and not too heavy, in single action mode it is even lighter and shorter.

Accuracy: NA.

Build Quality: The overall build quality of this gun is very good. The design and materials all seem to be good quality. The cosmetics look good but when closely inspected there are small imperfections such as tool marks and some finishing blemishes. Not a big deal but if you are picky about this kind of thing then it may turn you off a bit.

Realism: This gun in theory is not supposed to be a replica of any gun in production but it does resemble many common snub nosed revolvers available such as the Rossi Snub Nosed Revolvers. It would be hard to tell the difference between the Zoraki R1 and a real snub nosed revolver even side by side. The only real tell tale sign would be if you looked at the front of the cylinder, you may notice the front bullet ports are smaller than they should be, more like a 22 caliber. The Zoraki looks and feels like a real gun, so make sure to take precautions when using this blank revolver!

Purchased From:CanadaAmmo.com.

Pros:

  • In Canada it is one of the few Blank guns available for purchase that is not prohibited.

  • All metal construction, with the exception of the grips.

  • Attractive styling, many finishing options available.

  • Well priced.

<!-- google_ad_client = "ca-pub-9036472715040282"; /* Replica Airguns Content */ google_ad_slot = "1487049688"; google_ad_width = 468; google_ad_height = 15; //-->

Cons:

  • Finishing detail could be better.

  • Pistol grips are hard plastic, would be better in rubber.

  • 9mm P.A.K. Blank ammo is expensive.

Comments:

The Zoraki R1 (2.5) is a nice addition to my Replica gun collection, if you are a Canadian then there are few options available to us if you want to legally own a Blank shooter. I do like the look of this Zoraki snub nosed revolver, especially in the two-tone configuration that I purchased. I'm not sure of the availability of Zoraki gun in other parts of the world but in the US there is another Snub Nosed Revolver that is virtually identical, made by the company Viper for about $99.

My Vimeo Video Review for this Airgun:

Categories: 9mm, Blank Gun, Pistol, Review, Revolver, Semi Auto, YouTube Video Tags: R1

Zoraki R1 (2.5) Blank Revolver Arrives!

8 Comments

Related Posts:

WOW! That was fast shipping from CanadaAmmo.com!!! I ordered my Zoraki R1 (2.5) Blank Revolver on Tuesday the 28th and got it today the 30th! I got my tracking number today expecting it to have an estimated arrival day sometime next week and when I checked it out it said it was already at the post office waiting for me. I don't know exactly where CanadaAmmo.com is located but from my tracking info it looks like they may be located somewhere in Vancouver BC which is very close to where I live.

I will be posting a more thorough review with Video hopefully sometime next week on the Zoraki R1 (2.5) Blank Revolver but for now I wanted to give you my first impressions with a few photos.

The gun comes in a nice box wrapped inside a plastic bag to keep the other accessories from scratching it along the way. Mine was pretty greasy and needed a wipe down and then a re-oil but that's better than dry and rusty any day. Inside the case there is a manual, a cleaning rod and a flare adaptor. I was also pleasantly surprised to see that CanadaAmmo.com gave me a FREE pack of targets (with their marketing on it of course).

The gun looks great and I love the two-tone Satin/Black finish that I selected. Mine had a few tool marks on it but over all it's not bad and I am sure it will get more marks along the way...

The gun is a good size and weight, not huge or not small either. It does not feel cheap and looks more like a real gun than a blank gun. The Canadian Zoraki R1 (2.5) Blank Revolver discharges out of the front of the barrel like my other Zoraki Mod.914 which is always very nice and more realistic.

The Zoraki R1 uses 9mm blanks and can take the standard 9mm P.A.K rounds but they seem a bit loose and may not eject properly. I believe the right ammo to use would be the Crimped Blank 9mm rounds which I do not have. (If anyone knows where I can get some 9mm crimped blanks in Canada please let me know?)

I look forward to shooting this well made Zoraki Blank gun sometime in October amongst the other Halloween explosions...

Buy Blank Guns in Canada   -   Buy Blank Guns in the US

Categories: 9mm, Blank Gun, Pistol, Revolver, Semi Auto Tags: R1, Zoraki