Umarex presented at SHOT Show this year a license I think we all thought was never going to happen! That would be Glock, for years Glock has been steadfast about not allowing their handguns to be licensed by anyone other than them. Glock has been very protective about their brand and intellectual properties as they are entitled to. I'm not sure what Umarex said to Glock but somehow they where able to get Glock to agree to letting Umarex license Glock pistols to be made into BB and Airsoft versions. The first BB and Airsoft models I was able to checkout at this years SHOT Show are pretty basic in design and are styled after the Glock 19.
The new Umarex Glock 19 licensed BB and Airsoft pistols are CO2 powered as expected but don't have blowback operation and have a fixed metal slide and a drop out stick magazine. The new Glock Licensed Umarex pistols do however look and feel really good, picking them up you would think you are holding a real steel Glock until you try and rack the slide or drop the magazine. Umarex did indicate there will be more licensed models coming out down the road with full blowback operation and full size drop out metal magazines, we just need to be patient as Glock is very particular about the quality control.
Another show stopper for me at the Umarex Booth was the Legends Cowboy Lever Action Shell loading BB Rifle. I love shooting my Red Ryder BB Rifle but I have to admit the Red Ryder kind of looks a bit like a kids beginner airgun. The new Umarex Legends Cowboy Lever Action Shell loading BB Rifle look, feels and operates like the real deal so it's not only going to be super fun to shoot but an awesome replica to own especially if your into the old west guns.
The Umarex Legends Cowboy Lever Action Shell loading BB Rifle uses two 12 gram CO2 cartridges and can hold 10 BB loaded shells in its tube styled magazine, working the lever action elects the empty shells. Umarex claims around 410 fps so the Umarex Legends Cowboy Lever Action Shell loading BB Rifle will be Canada legal without the need for a PAL. I thought the stock was real wood but was correct, it's actually made out of plastic, but I think just about anyone looking close up would have a hard time believing Umarex didn't use real wood.
Thanks to Mark Davis from Umarex for making himself available to interview!
I wanted to start my SHOT Show 2018 Interviews with Crosman because in my books they had one of the most exciting new products this year at SHOT Show, the Crosman Remington DPMS SBR which is a duel 12 gram CO2 powered 4.5mm steel BB firing AR styled semi and full auto Machine gun.
What I like about the Crosman Remington DPMS SBR is that it works a lot like an Airsoft Gas Blowback rifle with an internal bolt and buffer tube spring, working charging handle and dust cover, it even has a bolt release button. The Crosman Remington DPMS SBR can even be taken apart similarly to a real AR rifle.
The next new interesting product from Crosman, and as I found out the design is not entirely exclusive to Crosman, was the CO2 Non-Blowback Pellet firing 1911. The Crosman Pellet 1911 has an interesting magazine design, it looks like a traditional full size drop out magazine, which as you would expect holds the CO2 but rather than an inline BB magazine the new Crosman Pellet firing 1911 has two built in 6 shot rotary magazines that can be flipped so you essentially end up with a 12 shot magazine.
You will have to drop the full size magazine after the first 6 shots to flip the rotary magazines. The Crosman Pellet 1911 does not have blowback action but the double action only trigger is smooth and not too heavy. The slide is metal with a metal magazine and a polymer frame. The Crosman Pellet shooting 1911 comes in silver and black.
The next new product from Crosman was the Mako. The Crosman Mako is a Beretta styled CO2 Blowback BB pistol. The Crosman Mako features Blowback action, fiber optic sights, tactical grips, a double action trigger and a stick magazine that holds the 4.5mm steel BB's.
Thanks to Phillip Guadalupe from Crosman for allowing me the Interview!
So it begins, I have been to this years SHOT Show in Las Vegas and checked out the new products from Umarex, Crosman, Sig Sauer and ASG. I have taken video and Interviewed the main Airgun companies. Now it's time to report back to everyone what I saw and learned. To start with here is a Teaser Video with some scenes from Vegas, inside SHOT Show and of course some of the highlight products from each airgun company.
Wow, we had a great contest giveaway for the Umarex Ace in the Hole Single Action Army Revolver. We received 406 participants with close to 2000 separate entries, so thank you everyone that got involved. Unfortunately for the other 405 participants there can only be one winner and to see who that winner is you're going to have to watch my Contest Giveaway announcement video...
This Black Friday weekend save 10% on everything in our Canada and US Online Replica Airguns Stores! It's already begun and ends Monday night so don't wait too long...
This weekend save up to 10% on BB, pellet and airsoft rifles!
Also, loyal blog and channel followers get a coupon code for FREE SHIPPING on their purchase. Now that's something to be thankful for! Read this post for details!
Type: Break barrel pellet rifle. Manufacturer: Umarex USA. Model:Ruger Explorer. Materials: Metal and polymer parts. Weight: 4.45 pounds (2.5 kg). Barrel: 12 inches, metal rifled. Propulsion: Spring piston. Action: Single shot. Ammunition Type: .177 caliber pellets. Ammunition Capacity: 1. FPS: 495.
Trigger Pull: I found the Ruger Explorer Youth Break Barrel Pellet Rifle to have a fairly light trigger, there is some initial take up with a smooth almost undetectable break or release point, I found that as I shot the Ruger Explorer Youth Break Barrel Pellet Rifle the trigger seemed to be breaking in a bit which made it a bit hard to figure exactly when the trigger was going to release but I feel over time and once the Ruger Explorer Youth Break Barrel Pellet Rifle is broken in the trigger will become more predictable.
Accuracy: Since I have already made a shooting or field test video for the Ruger Explorer Youth Break Barrel Pellet Rifle, I can comment on its performance n this review! With 6 grain lead pellets (on the lighter side), I was able to get a 5 shot Chronograph average velocity of 485 fps. Using heavier 7-8 grain pellets the velocity slowed down a bit to around 400 fps. In terms of accuracy the Ruger Explorer Youth Break Barrel Pellet Rifle performed well getting about a 1 inch 10 shot grouping on my paper target setup 30 feet down range. I know the Ruger Explorer Youth Break Barrel Pellet Rifle can do better than this once the trigger settles down a bit since some shots went off unexpectedly.
Build Quality: The Ruger Explorer Youth Break Barrel Pellet Rifle is not an expensive air rifle and is more or less an entry level spring piston pellet shooter. That said it is built fairly well with a metal receiver, barrel and trigger setup. The modern looking stock is polymer and the steel barrel is coated in a synthetic soft plastic to help with long term durability. The real fiber optic sight is plastic so you will have to be careful with it as it does protrude a bit from the air rifle.
Realism: Since the Ruger Explorer Youth Break Barrel Pellet Rifle is not a replica realism is not really a factor here but it does look like a gun so treat it as if it was a real gun since most people will not know the difference. Always transport and store any airgun safely and discreetly.
Pros:
Really great looking air rifle with a modern look to it.
Finish is very durable with its polymer stock and plastic/rubber coated barrel.
Fully adjustable fiber optic sights are easy to sight in and use.
Receiver is notched for ring mounts so you can add an optical sight or red dot to it.
Trigger is fairly light, just need some break in time with it.
Cocking effort is fairly easy at 16.5 pounds.
Great size gun for all ages.
Power and accuracy were good for an entry level air rifle.
Cons:
I did find the trigger break/release point to be a bit unpredictable but I feel this is a break-in issue and will become more consistent over time.
You have to remember to push that safety in with ever shot.
Comments: The Ruger Explorer Youth Break Barrel Pellet Rifle is marketed as a Youth air rifle but in reality it would be great fun for all ages. I am a fairly large person at 6 feet tall and I had no problem dealing with the slightly shorter configuration. The trigger guard is nice and open and allows for large fingers which is not always the case with airguns designed for smaller individuals. The overall quality you get with the Ruger Explorer Youth Break Barrel Pellet Rifle for the lower entry level price tag is very good and in terms of performance I feel you for sure get your monies worth with the Ruger Explorer Youth Break Barrel Pellet Rifle.
I don't do a lot of Springer (Spring Piston) Air Rifle shooting tests or even reviews for that matter. Mainly for a couple of reasons: Number 1, my content is mostly focused around Replica style Airguns and Number 2, it's kind of hard to test out the longer range airguns in my 30 foot airgun range. That said I felt the Ruger Explorer Youth Break Barrel Pellet Rifle would be a really great airgun to review since it is both affordable and even though it is targeted for the youth market, it really does make a great shooter for all ages.
I have not done a Table Top Review for the Ruger Explorer Youth Break Barrel Pellet Rifle but plan to shortly so stay posted for more detailed info on the Ruger Explorer Youth Break Barrel Pellet Rifle down the road in that review.
So how'd we do during my Field Test Shooting Video for the Ruger Explorer Youth Break Barrel Pellet Rifle? Not bad I would say! Using about 6 grain rather light weight .177 caliber lead pellets I was able to get really close to the 500 fps claimed fps mark coming in just under at a 5 shot testing average of 485 fps. I did put a couple heavier grain pellets through my Chrony Chronograph and got closer to the 400 fps mark, still not bad for this lighter sprung spring piston air rifle.
In terms of accuracy, shooting at my paper target setup 30 feet down range in my Sea Can Airgun Range, I shot about a 1 inch 10 shot grouping. I was finding the trigger break-in to be a bit unpredictable during this testing which led to some premature shots going off so I do feel once the Ruger Explorer Youth Break Barrel Pellet Rifle is broken in and me getting use to the trigger break, I should be able to improve on this result.
Overall the Ruger Explorer Youth Break Barrel Pellet Rifle is a really nice entry level airgun perfect for all ages and not just the youth market. It looks really cool, is easy to cock and has a very resilient finish. Oh ya it shoots pretty good to!
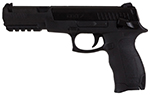
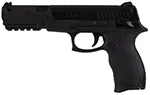
I was a bit surprised by the Umarex DX-17 Spring Powered BB Pistol, it actually shot a lot better than I was expecting it to perform. I did have to aim rather low since the Umarex DX-17 BB Pistol likes to shoot on the high side but if you are shooting at closer in ranges then you won't have to adjust your aim point so high.
Getting into my performance testing for the Umarex DX-17 Spring Powered BB Pistol, I placed 5 shots through my Chrony Chronograph and averaged 210 fps which again was very close to the Umarex claimed 200 fps, even a little bit higher! he DX-17 is a single shot repeater but because of the BB reservoir you can quickly reload follow up shots by simply point the Umarex DX-17 Spring Powered BB Pistol a little upward while pulling the slide back and pushing it forward to active the spring piston and load a BB at the same time.
As I mentioned the Umarex DX-17 Spring Powered BB Pistol shot on the high side, at 30 feet it's a good 8-9 inches high but I have a feeling that this is about as high as the BB's will rise since they are not going that fast and gravity will start bringing them back down. At about 10-15 feet out from a target the Umarex DX-17 Spring Powered BB Pistol seemed to shoot about 3-4 inches high so not nearly as bad and this can be adjusted pretty easy by simply aiming a bit under the target you are shooting at. In terms of a 10 shot grouping theUmarex DX-17 Spring Powered BB Pistol got about a 4 inch grouping which I have to say kind of surprised me as I was expecting a much larger spread.
So for about $20 you kind of get what you pay for but I really think with the Umarex DX-17 Spring Powered BB Pistol you perhaps get a little more! It has a really good trigger, seemed to be built pretty tuff, shot exactly right on the claimed fps mark and was even able to keep a reasonable grouping. And to keep costs down even more you never need to buy CO2 so that's another bonus.
Trigger Pull: The single action only trigger pull on the Umarex DX-17 Spring Powered BB Pistol is actually pretty good. It's fairly short with only a little bit of very light take up and then an easy release that has no added friction. So you will have to get use to when and where the release happens but it is a really decent trigger for such an inexpensive airgun.
Accuracy: I have only shot the Umarex DX-17 Spring Powered BB Pistol a few times to get use to the mechanical operation of using this spring powered pistol since there is a very specific order in which you need to cock and load the Umarex DX-17 for proper operation. I did find the DX-17 shot a bit high for me at 30 feet out so I had to adjust my aim point about 5-6 inches lower to hit targets at this range. For further out shooting you many not need to do so since the fps is fairly low and I would expect the BB to drop pretty quickly. In terms of power being that the Umarex DX-17 Spring Powered BB Pistol is only rated at 200fps, well it seems sufficient enough for plinking away at targets and should have no problem getting through a pop can.
Build Quality: I was expecting this $20 low cost BB airgun to be fairly low quality in general but when I took it out of the plastic clamshell packaging I was pleasantly surprised by the overall quality and how the Umarex DX-17 Spring Powered BB Pistol felt in my hand. It has a good weight to it and the fit and finish are really good. Mechanical parts tolerances feel snug and the plastic used feels of good quality.
Realism: The Umarex DX-17 Spring Powered BB Pistol as far as I know is not a replica of any specific real steel gun in production but it does kind of remind me of a Browning Hi-power at least the back half and the way the frame angles up a bit in front of the trigger. Other than that it looks the part of a real gun. The DX-17 has what looks like real working parts on it with the slide catch, magazine release and magazine but plat all moulded into the airgun. Available at the:Replica Airguns Store
Pros:
At $21 Canadian its great value for a target plinker.
It actually looks and feels pretty good in person, better than I expected build quality and weight to it.
No CO2 required so very cheap to shoot.
Single action trigger is actually really decent, better than most airguns.
Accessory rail for adding a red dot or perhaps a tactical light.
15 round reservoir makes followup shots quicker and no fumbling around loading BB’s in-between shots.
Lower fps means if you do do something stupid you are less likely to have to make a trip to the doctor
Cons:
Pretty low fps so don’t expect any long range shooting or great penetration.
Sights are not adjustable and it seems to shoot kind of high.
Why not rifle the barrel and make pellets an option?
Comments:
I rarely review these super low cost airguns especially spring powered ones with low fps, it almost seems like why would you want any of that? But you know the Umarex DX-17 Spring Powered BB Pistol is actually a great little airgun and you really can't beat the price tag. You are also going to save a bunch of money not having to buy CO2 and once you load 15 rounds into the BB reservoir you can empty the DX-17 fairly quickly. Sure the power seems a bit low but it gets the job done and like I said if there was an accident, you are less likely to break that window or require medical attention. I think this would be a great add on to an existing order you might be making with us, that way you wouldn't have to pay for shipping for this one item and you get a fun little plinker for only $20 more.
My Vimeo Videos for the Umarex DX-17 Spring Powered BB Pistol:
Well the Shipping Container Office and Airgun Shooting Range is finally all ready to use and so for this first ever airguns shooting video in it, I simply wanted to try out a couple of airguns and see how this new setup worked. I also wanted to play around with some camera position setup to see how it all looked and if there will be any additional lighting or placement considerations.
Summer is here! While some folks are working on a tan, you're out working on your aim. This weekend, stock up on all the essentials — ammo, CO2, targets, extra mags — so you can shoot until the sun goes down.
When you spend $50 or more on any items, we'll ship them to you for free! Ends Monday, so don't wait.
I got a lot done this week in the Shipping Container Project Office and Airgun Shooting Range. Finished up all the drywall office mudding, I primed and painted the the office, connected up all the electrical and office lighting and installed the hardwood and baseboard along with the trimming. All that's left in the office is some caulking, paint touchup and then I have to figure out how I'm going to finish up the shooting hole? I do have some ideas for it though...
Next week I will be working on these odds and ends and hopefully may even get the shooting range spray foam insulted?
About three weeks ago I started the interior construction of the Shipping Container Project. So far I have cut out the window and door, framed the office in, installed the window and door, done some preliminary painting, wired in electricity for the entire unit, added an internet line, run underground wiring to the main house, installed insulation and vapor barrier and last but not least, added the drywall. I would have to say the worst is over and now I look forward to more of the finishing work like painting, flooring, connecting the electrical plugs and lighting fixtures.
The only real big jobs left to do would be painting the outside of the Sea Can and spray foam insulating the shooting range area but the spray foaming I will be contracting out and getting it done professionally so that part will be easy at least!
Yup, another Shipping Container Project Update Video! For those of you interested in this project I am sure you have been waiting with baited breath ;) And for those wanting more airgun videos you are probably wondering when I will resume making more... Heck, I'm with you on that one, this manual labour stuff is way harder than making airgun videos, but it is all for the greater good. I will try and slip in some airgun related videos before this Shipping Container Project is finished, that's almost a promise!!!
At this point I am almost ready for drywall, all the electrical is completed including running the power and Internetunderground to the poorhouse and main house. I need to have my Internets at full jam, that's a must!
This week I will be getting the electirfcal all hooked up to the main box, adding isulation and vapour barrier, some more window baar cleanup and painting and by end of the week I hope to have the drywall in place along with the taping and first layer of mud.
Oh yah, this video also includes a huge bonfire, every spring and fall we usually burn all the fallen branches and yard debris, everyone comes out and enjoys the huge fire :)
The Shipping Container Project is moving along nicely, this past week I finished up my office area framing, I also got the door and window cutout and installed! Next up on my list is cleaning up and painting the window bars so I can make the unit a bit more secure. I suppose I will have to do the same with the metal door since it is in dire need of a facelift. Once the doors and windows are all taken care of I will be moving on to the electrical and wiring. My goal is to get all of this done by end of week... The sooner I get this Shipping Container Project done the sooner I can get back to making even better and more consistent airgun videos in my new home.
This week I started framing in my new office and in this video I show the wall closest to the airgun range where the door and shooting opening are situated. I managed to frame the back wall in too. I also talk about how much time it takes even before you pick up a drill or hammer simply planning everything out and acquiring all the supplies required for a project like this. I have spent a ton of time researching what I need to make this Shipping Container Project into the vision I have for it. Spoiler alert, in my next video the framing is all done including the installation of my window and outside door, glad that part is over!
No need to hunt for deals this Easter, EVERYTHING in our store is on sale! So kickoff your long weekend with a long-barreled revolver. Celebrate spring’s arrival with a spring powered sniper rifle. Or treat yourself to a hollow chocolate bunny and some hollow point pellets. This deal ends soon, so hop to it!
Lately I have been doing a lot of sourcing out figuring out how everything is going to be laid out, what kind of lighting I want to use, how am I going to heat the office area in my shipping container. I want to keep everything pretty low power so my plan is to go with all LED lighting and a 400 Watt heater which should be
fine in my 90 square foot insulated office space. I plan to blast the shooting range with some propane heat on days when I need it for the shooting testing during the colder months.
I did pickup some hardwood flooring pretty cheap at Big Box Store and also got my 3x6 office window from Surrey New and Used. I already have metal doors that my father-in-law has had stashed away for several decades but at least now they are going to come in handy.
The first job or actual work I needed to do on the Shipping Container Project was to level and place the Sea Can onto some bricks/slabs, this also helps to keep the underside dry so it does not rust out. There shouldn't be much settling since the storage container is resting on my gravel parking area and the gravel goes right down about 1 foot deep to the hard pan.
Next on my list is starting the framing, figuring out exactly where the windows and doors will be and of course cutting the container to fit them.